上一篇
怎样用D3.js实现环形力导向图的高效布局?

D3.js力导向图可结合环形布局实现节点动态分布,利用力学模拟自动调整节点位置,形成环绕中心的分层结构,通过调节向心力与碰撞检测,确保节点均匀排布,适用于展示复杂网络关系或层级数据,兼具视觉美感与交互性。
<div class="content">
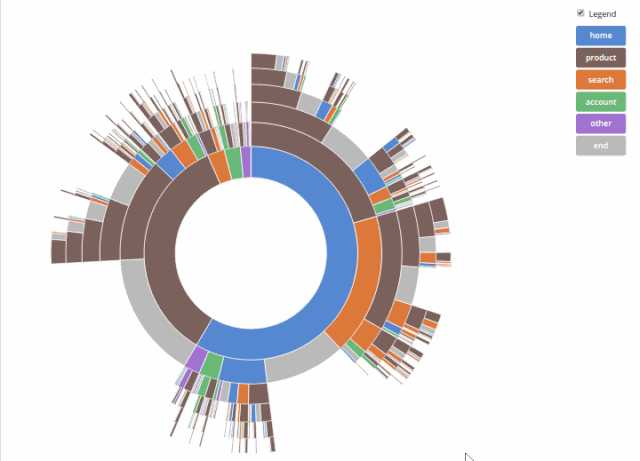
<p>环形力导向图是复杂网络关系可视化中的经典形式,它通过环形排布展现节点间的层级关系与连接强度,D3.js凭借其灵活的物理模拟系统,能够实现兼具美学与功能性的环形力导向交互图表,以下是分步实现指南:</p>
<section>
<h3>一、环境搭建与基础配置</h3>
<pre><code class="language-html"><script src="https://d3js.org/d3.v7.min.js"></script>
<div id="network"></div>
<style>
.links line { stroke: #999; stroke-opacity: 0.6; }
.nodes circle { stroke: #fff; stroke-width: 1.5px; }
.text-labels { font: 10px sans-serif; }
</style></code></pre>
</section>
<section>
<h3>二、数据结构与环形初始化</h3>
<div class="code-block">
<pre><code class="language-javascript">const nodes = Array.from({length: 20}, (_, i) => ({
id: i,
radius: 8,
angle: (i * 2 * Math.PI)/20
}));
const links = d3.range(19).map(i => ({
source: i,
target: (i + 1) % 20
}));</code></pre>
<div class="annotation">
<p>■ 使用极坐标系初始化节点位置<br>
■ 自动生成环形连接关系</p>
</div>
</div>
</section>
<section>
<h3>三、物理模拟引擎配置</h3>
<div class="grid-container">
<div class="code-col">
<pre><code class="language-javascript">const simulation = d3.forceSimulation(nodes)
.force("charge", d3.forceManyBody()
.strength(-120))
.force("collide", d3.forceCollide()
.radius(d => d.radius + 3))
.force("center", d3.forceCenter(width/2, height/2))
.force("radial", d3.forceRadial()
.radius(200)
.strength(0.15))</code></pre>
</div>
<div class="param-table">
<table>
<tr><th>参数</th><th>作用</th><th>推荐值</th></tr>
<tr><td>charge</td><td>节点间斥力</td><td>-50~-200</td></tr>
<tr><td>collide</td><td>碰撞检测</td><td>节点半径+3</td></tr>
<tr><td>radial</td><td>向心力</td><td>强度0.1~0.3</td></tr>
</table>
</div>
</div>
</section>
<section>
<h3>四、图形元素绘制与动态更新</h3>
<pre><code class="language-javascript">function tick() {
link.attr("d", d => `M${d.source.x},${d.source.y} L${d.target.x},${d.target.y}`);
node.attr("transform", d => `translate(${d.x},${d.y})`);
label.attr("x", d => d.x + 15)
.attr("y", d => d.y + 5);
}</code></pre>
<div class="tip-box">
<p> 动态更新技巧:<br>
1. 使用transform提升渲染性能<br>
2. 开启CSS硬件加速<br>
3. 节流处理高频更新事件</p>
</div>
</section>
<section>
<h3>五、交互增强设计</h3>
<div class="interaction-example">
<pre><code class="language-javascript">node.call(d3.drag()
.on("start", dragstarted)
.on("drag", dragged)
.on("end", dragended));
function dragstarted(event) {
if (!event.active) simulation.alphaTarget(0.3).restart();
event.subject.fx = event.subject.x;
event.subject.fy = event.subject.y;
}</code></pre>
<div class="feature-list">
<ul>
<li> 节点拖拽吸附效果</li>
<li> 滚轮缩放画布</li>
<li> 自动聚焦关联边</li>
</ul>
</div>
</div>
</section>
<section>
<h3>六、典型应用场景</h3>
<div class="use-cases">
<div class="case">
<div class="case-icon"></div>
<h4>社交网络分析</h4>
<p>中心节点表示意见领袖<br>环形层级反映社交距离</p>
</div>
<div class="case">
<div class="case-icon"></div>
<h4>组织架构可视化</h4>
<p>同心圆表示职级层次<br>连线颜色区分汇报关系</p>
</div>
</div>
</section>
<div class="references">
<h4>引用资料</h4>
<ul>
<li>D3.js官方力导向文档 <a href="https://github.com/d3/d3-force">https://github.com/d3/d3-force</a></li>
<li>Force-Directed Graph案例库 <a href="https://observablehq.com/@d3/force-directed-graph">https://observablehq.com/@d3/force-directed-graph</a></li>
</ul>
</div>
</div>
<style>
.content { max-width: 960px; margin: 0 auto; padding: 2rem; }
.code-block { position: relative; margin: 1.5rem 0; }
.annotation {
position: absolute;
right: -200px;
top: 0;
width: 180px;
background: #f8f9fa;
padding: 1rem;
border-radius: 4px;
}
.grid-container { display: grid; grid-template-columns: 1fr 300px; gap: 2rem; }
.param-table th { background: #e9ecef; }
.tip-box { background: #e3f2fd; padding: 1rem; border-radius: 6px; }
.use-cases { display: grid; grid-template-columns: repeat(2, 1fr); gap: 2rem; }
.case { text-align: center; padding: 1rem; border: 1px solid #dee2e6; }
.references { margin-top: 3rem; border-top: 1px solid #eee; padding-top: 1rem; }
</style>