上一篇
Angular如何封装网络请求?最佳实践与代码示例分享
在Angular应用开发中,网络请求是连接前端与后端服务的核心环节,良好的请求封装不仅能提升代码复用性,还能增强项目的可维护性和安全性,本文将从基础封装、拦截器机制、错误处理、性能优化四个维度,系统介绍Angular网络请求的封装方法。
基础封装:基于HttpClient的请求服务
Angular通过HttpClient模块提供HTTP请求能力,但直接在组件中调用HttpClient会导致代码冗余且难以管理,推荐创建一个独立的HttpService,统一封装GET、POST、PUT、DELETE等请求方法。
在app.module.ts或核心模块中导入HttpClientModule:
import { HttpClientModule } from '@angular/common/http'; @NgModule({ imports: [HttpClientModule], // ... }) export class AppModule { }
创建http.service.ts,封装基础请求方法:
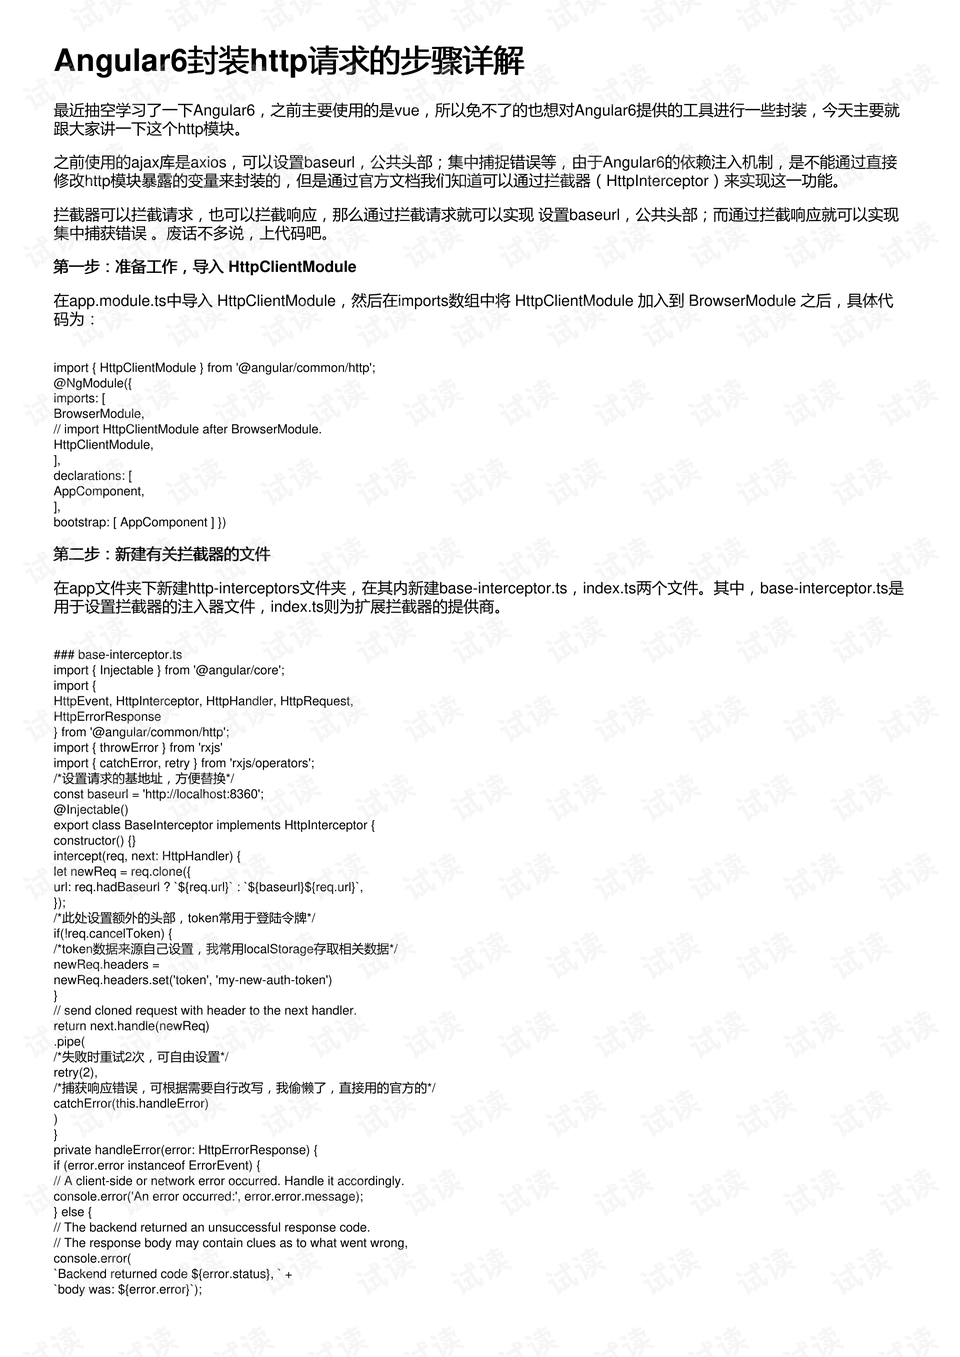
上述封装通过泛型<T>支持不同接口的响应类型,并通过HttpParams处理查询参数,确保请求灵活性。
拦截器机制:统一处理请求与响应
拦截器是Angular提供的强大功能,可在请求发送前或响应返回后进行统一处理,如添加请求头、token验证、数据转换等,创建拦截器需实现HttpInterceptor接口。
请求拦截器:添加认证头
import { Injectable } from '@angular/core'; import { HttpEvent, HttpInterceptor, HttpHandler, HttpRequest } from '@angular/common/http'; import { Observable } from 'rxjs'; @Injectable() export class AuthInterceptor implements HttpInterceptor { intercept(req: HttpRequest<any>, next: HttpHandler): Observable<HttpEvent<any>> { const token = localStorage.getItem('token'); // 获取存储的token if (token) { req = req.clone({ setHeaders: { Authorization: `Bearer ${token}` } }); } return next.handle(req); } }
响应拦截器:统一错误处理
import { Injectable } from '@angular/core'; import { HttpEvent, HttpInterceptor, HttpHandler, HttpRequest, HttpErrorResponse } from '@angular/common/http'; import { Observable, throwError } from 'rxjs'; import { catchError } from 'rxjs/operators'; @Injectable() export class ErrorInterceptor implements HttpInterceptor { intercept(req: HttpRequest<any>, next: HttpHandler): Observable<HttpEvent<any>> { return next.handle(req).pipe( catchError((error: HttpErrorResponse) => { let errorMessage = '未知错误'; if (error.error instanceof ErrorEvent) { errorMessage = `客户端错误: ${error.error.message}`; } else { errorMessage = `服务端错误: ${error.status} - ${error.message}`; } // 可结合UI框架提示错误,如使用MatSnackBar console.error(errorMessage); return throwError(errorMessage); }) ); } }
注册拦截器
在app.module.ts或核心模块中注册拦截器:
import { HTTP_INTERCEPTORS } from '@angular/common/http'; import { AuthInterceptor } from './auth.interceptor'; import { ErrorInterceptor } from './error.interceptor'; @NgModule({ providers: [ { provide: HTTP_INTERCEPTORS, useClass: AuthInterceptor, multi: true }, { provide: HTTP_INTERCEPTORS, useClass: ErrorInterceptor, multi: true } ] }) export class AppModule { }
拦截器按注册顺序依次执行,适合处理全局逻辑,如认证、日志、缓存等。
错误处理:分层捕获与友好提示
网络请求中的错误可分为客户端错误(4xx)和服务端错误(5xx),需分层处理并返回友好提示,在HttpService中扩展错误处理方法:
import { throwError } from 'rxjs'; import { retry, catchError } from 'rxjs/operators'; // 在HttpService中添加 postWithError<T>(url: string, data: any): Observable<T> { return this.http.post<T>(`${this.apiUrl}${url}`, data).pipe( retry(2), // 失败重试2次 catchError(error => { if (error.status === 401) { // 跳转登录页或刷新token this.router.navigate(['/login']); } else if (error.status === 500) { // 服务端错误,提示用户稍后重试 this.showMessage('服务器繁忙,请稍后再试'); } return throwError(error); }) ); }
通过retry operator实现失败重试,结合业务逻辑区分错误类型,提升用户体验。
性能优化:请求缓存与节流
请求缓存
对于频繁请求且数据变化不频繁的接口(如配置信息),可通过HttpClient的缓存机制优化:
import { Injectable } from '@angular/core'; import { HttpClient } from '@angular/common/http'; import { Observable } from 'rxjs'; import { shareReplay } from 'rxjs/operators'; @Injectable({ providedIn: 'root' }) export class CacheService { private cache = new Map<string, Observable<any>>(); get(url: string): Observable<any> { if (this.cache.has(url)) { return this.cache.get(url)!; } const request = this.http.get(url).pipe( shareReplay(1) // 共享响应,缓存最新结果 ); this.cache.set(url, request); return request; } }
请求节流
对于高频触发的事件(如滚动加载),可通过debounceTime节流,避免短时间内重复请求:
import { debounceTime } from 'rxjs/operators'; // 在组件中使用 loadMore(): void { this.scrollEvent.pipe( debounceTime(500) // 500ms内只发送一次请求 ).subscribe(() => { this.httpService.get('/data', { page: this.currentPage }).subscribe(res => { this.dataList = [...this.dataList, ...res]; }); }); }
Angular网络请求的封装需遵循“单一职责”原则,通过基础服务统一接口调用,拦截器处理全局逻辑,错误保障稳定性,缓存与节流提升性能,合理的封装不仅能减少重复代码,还能让项目在迭代中保持清晰的架构,开发者可根据实际需求扩展功能,如添加请求取消、进度显示等,进一步优化用户体验。
相关文章
-

VPS性能优化教程怎么做?Making Implicit Concepts Explicit隐式概念显式化原则
-
VPS性能优化教程,Language of the Domain领域语言原则是什么?
-
VPS性能优化教程,Binding Model绑定模型实现原则是什么?
-
VPS性能优化教程怎么做?VPS性能优化方法详解
-

VPS性能优化教程怎么做?VPS优化方法详解
-
VPS性能优化教程,Refactoring Toward Deeper Insight重构深入洞察原则,VPS如何进行性能优化?
-
VPS性能优化教程:Hands-On Modelers实践建模者原则
-
AS4837青云互联悉尼VPS路由分析,青云互联悉尼VPS怎么样