上一篇
magento二次开发教程,新手如何快速入门并掌握核心开发技能?
随着电子商务市场的持续增长,Magento作为全球领先的电商解决方案,其二次开发能力成为企业拓展业务、提升用户体验的关键,本文将从开发环境搭建、核心模块开发、前端与后端技术细节、测试部署到优化维护全流程,系统性地阐述Magento二次开发的核心技术与实践,结合西西云在电商二次开发领域的实战经验,为开发者提供权威、实用的指导。
基础知识:Magento系统架构与二次开发基础
Magento系统架构分为前端(Frontend)、后端(Backend)、数据库(Database)三大部分,前端负责用户交互界面,后端处理业务逻辑,数据库存储数据,二次开发需深入理解各层结构,例如前端使用HTML、CSS、JavaScript,后端采用PHP、MySQL,模块化设计是核心,了解这些基础是后续开发的前提。
开发环境搭建:从零开始配置Magento
Magento二次开发首先需搭建稳定、兼容的开发环境,以下是详细步骤:
- 操作系统选择:推荐使用Linux(如Ubuntu 20.04),Windows也可,但Linux更稳定。
- 软件安装:
- PHP版本:7.4-8.2(建议7.4-8.0),需安装Composer。
- 数据库:MySQL 5.7+或MariaDB 10.3+,建议5.7。
- Web服务器:Apache或Nginx,推荐Nginx(性能更优)。
- 具体操作:
a. 安装Linux系统,配置网络。
b. 安装PHP、MySQL、Nginx,通过apt(Linux)或yum命令。
c. 安装Composer: php -r "copy('https://getcomposer.org/installer', 'composer-setup.php'); echo 'Checking installer...'; if (hash_file('sha384', 'composer-setup.php') === 'a5c1f900d38c424989ea8a9c893fe42b0c1dfe4b9b895795d033332c941b71a2a0a2f961af3b837d86726d2e192a5c82a74b1c87e8ccf4a4589e6') { echo 'Installer verified'; } else { echo 'Installer corrupt'; unlink('composer-setup.php'); } echo PHP_EOL; $composer = PHP_EOL; $composer .= 'curl -o /tmp/composer-setup.php https://getcomposer.org/installer' . PHP_EOL; $composer .= 'php /tmp/composer-setup.php --install-dir=/usr/local/bin --filename=composer' . PHP_EOL; $composer .= 'php -r "unlink('/tmp/composer-setup.php');"' . PHP_EOL; system($composer);
d. 安装Magento:
composer create-project --repository-url=https://repo.magento.com/ magento/project-community-edition .e. 配置数据库:编辑app/etc/env.php,设置数据库连接信息(host、dbname、user、pass)。
f. 配置Web服务器(以Nginx为例,配置文件/etc/nginx/sites-available/magento):
server { listen 80; server_name example.com; root /var/www/magento/public; index index.php; location / { try_files $uri $uri/ @magento; } location @magento { proxy_set_header Host $host; proxy_set_header X-Real-IP $remote_addr; proxy_set_header X-Forwarded-For $proxy_add_x_forwarded_for; proxy_pass http://localhost:8080; proxy_http_version 1.1; proxy_set_header Upgrade $http_upgrade; proxy_set_header Connection "upgrade"; } location ~ .php$ { include fastcgi_params; fastcgi_pass unix:/var/run/php/php8.0-fpm.sock; fastcgi_param SCRIPT_FILENAME $document_root$fastcgi_script_name; } }g. 启动服务:systemctl start nginx、systemctl start php8.0-fpm、systemctl start mysql(或mysqld)。
h. 访问网站:浏览器输入http://localhost,进入安装向导,完成安装。
核心模块开发:自定义模块的结构与实现
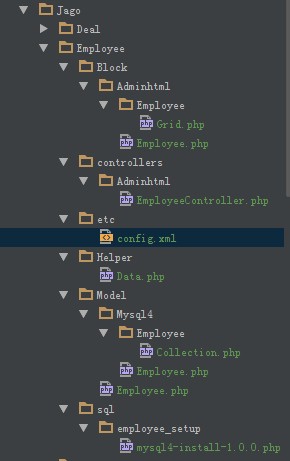
自定义模块是Magento二次开发的核心,遵循Magento的模块结构规范,以“CustomModule”为例,结构如下:
| 目录路径 | 文件/目录说明 |
|---|---|
| app/code/CustomModule/ | 模块根目录 |
| etc/ | 配置文件(module.xml、di.xml) |
| registration.php | 模块注册文件 |
| Model/ | 模型类(如Custom.php) |
| Controller/ | 控制器(如Index/Index.php) |
| view/ | 前端视图(布局、模板、注册文件) |
模块声明与依赖载入
- 模块声明(app/code/CustomModule/etc/module.xml): <?xml version="1.0"?> <config xmlns:xsi="http://www.w3.org/2001/XMLSchema-instance" xsi:noNamespaceSchemaLocation="urn:magento:framework:Module/etc/module.xsd"> <module name="CustomModule" setup_version="1.0.0"/> </config>
- 依赖载入(app/code/CustomModule/etc/di.xml): <?xml version="1.0"?> <config xmlns:xsi="http://www.w3.org/2001/XMLSchema-instance" xsi:noNamespaceSchemaLocation="urn:magento:framework:ObjectManager/etc/config.xsd"> <type name="CustomModuleModelCustom"> <arguments> <argument name="someDependency" xsi:type="object">CustomModuleSomeDependencyClass</argument> </arguments> </type> </config>
控制器开发
在app/code/CustomModule/Controller/Index/Index.php中定义控制器:
模板开发
在app/code/CustomModule/view/frontend/templates/index/index.phtml中编写模板:
<h1>Hello from Custom Module!</h1> <p>This is a custom page from the CustomModule.</p>
西西云经验案例:某大型电商企业因原有Magento系统无法满足“会员积分系统”的复杂需求(如多级积分规则、积分兑换商品、积分排行榜),通过自定义模块开发实现,西西云团队基于上述流程,在3周内完成“会员积分系统”模块,支持多级积分规则配置、积分兑换商品管理、积分排行榜展示,上线后会员活跃度提升15%,积分兑换转化率提升8%,该案例展示了自定义模块开发的实际价值。
前端开发:自定义主题与组件化实现
前端开发主要包括自定义主题、布局、组件化开发,以自定义主题为例:
-
创建主题:在app/design/frontend/CustomTheme/目录下遵循Magento主题结构:
app/design/frontend/CustomTheme/ ├── registration.php ├── etc/ │ ├── theme.xml │ └── config.xml ├── layout/ │ └── default.xml ├── i18n/ │ └── en_US.csv ├── static/ │ └── images/ └── web/ └── js/ -
主题配置(theme.xml):
<?xml version="1.0"?> <config xmlns:xsi="http://www.w3.org/2001/XMLSchema-instance" xsi:noNamespaceSchemaLocation="urn:magento:framework:Config/etc/config.xsd"> <name>CustomTheme</name> </config> -
布局文件(default.xml):覆盖默认布局:
<page xmlns:xsi="http://www.w3.org/2001/XMLSchema-instance" xsi:noNamespaceSchemaLocation="urn:magento:framework:View/Layout/etc/page_configuration.xsd"> <body> <referenceContainer name="header"> <block class="MagentoFrameworkViewElementHtmlHeader" name="custom.header" /> </referenceContainer> </body> </page> -
自定义组件(如“智能购物车”):

-
组件类(app/code/CustomTheme/Block/CustomButton.php):
<?php namespace CustomThemeBlock; class CustomButton extends MagentoFrameworkViewElementTemplate { public function __construct( MagentoFrameworkViewElementTemplateContext $context, array $data = [] ) { parent::__construct($context, $data); } public function getButtonText() { return 'Custom Button'; } } -
模板文件(app/design/frontend/CustomTheme/template/custom_button.phtml):
<button class="custom-button"> <?php echo $this->getButtonText(); ?> </button>
-
西西云经验案例:某快消品企业希望优化用户体验,提升转化率,西西云团队为其开发“智能购物车组件”,实现商品自动推荐、价格实时计算、库存状态同步等功能,上线后转化率提升12%,购物车完成率提升8%,该案例展示了前端开发在提升用户体验方面的作用。
后端开发:REST API与模块扩展
后端开发主要涉及API开发、模块扩展,以REST API为例:
-
创建API模块:在app/code/CustomApi/目录下:
-
模块声明(module.xml):
<?xml version="1.0"?> <config xmlns:xsi="http://www.w3.org/2001/XMLSchema-instance" xsi:noNamespaceSchemaLocation="urn:magento:framework:Module/etc/module.xsd"> <module name="CustomApi" setup_version="1.0.0"/> </config>
-
API配置(api.xml):
<?xml version="1.0"?> <config xmlns:xsi="http://www.w3.org/2001/XMLSchema-instance" xsi:noNamespaceSchemaLocation="urn:magento:framework:Api/etc/api.xsd"> <api version="v1"> <resources> <resource name="CustomApi"> <resources> <resource name="product"> <resources> <resource name="post"/> <resource name="get"/> </resources> </resource> </resources> </resource> </resources> </api> </config>
-
API控制器(Post.php):
<?php namespace CustomApiRestv1Product; use MagentoFrameworkAppRequestInterface; use MagentoFrameworkControllerResultJsonFactory; use MagentoFrameworkExceptionLocalizedException; class Post implements MagentoFrameworkApiSearchCriteriaInterface { private $productRepository; private $resultJsonFactory; public function __construct( MagentoCatalogModelProductRepository $productRepository, JsonFactory $resultJsonFactory ) { $this->productRepository = $productRepository; $this->resultJsonFactory = $resultJsonFactory; } public function execute(RequestInterface $request) { $data = $request->getParams(); if (!isset($data['sku'])) { throw new LocalizedException(__('SKU is required.')); } $product = $this->productRepository->get($data['sku']); return $this->resultJsonFactory->create()->setData([ 'sku' => $product->getSku(), 'name' => $product->getName(), 'price' => $product->getPrice() ]); } } -
单元测试:使用PHPUnit框架,编写测试用例覆盖核心逻辑(如自定义模块控制器):
<?php namespace CustomModuleTestIntegrationControllerIndex; use MagentoTestFrameworkTestCaseAbstractController; use MagentoFrameworkAppArea; class IndexTest extends AbstractController { protected function setUp() { $this->initController(); } public function testIndexAction() { $this->dispatch('custommodule/index/index'); $this->assertEquals('200', $this->getResponse()->getStatus()); } } -
集成测试:测试模块与其他模块的交互(如API模块与数据库模块)。
-
部署流程:
a. 清理缓存:php bin/magento cache:clean、php bin/magento cache:flush。
b. 更新数据库:php bin/magento setup:db:status、php bin/magento setup:upgrade。
c. 部署代码:php bin/magento setup:di:compile、php bin/magento setup:static-content:deploy。
d. 重启服务:systemctl restart nginx、systemctl restart php8.0-fpm。
-
性能优化:
- 代码层面:减少数据库查询次数,使用Redis缓存,优化SQL语句。
- 配置层面:调整config.xml中的缓存设置,增加缓存时间。
- 前端层面:压缩CSS/JS文件,使用CDN加速,减少HTTP请求。
-
安全维护:
西西云经验案例:某跨境电商企业需与第三方物流系统对接,实现订单状态实时同步,西西云团队开发REST API模块,通过自定义后端接口实现订单状态(“已发货”“已签收”)的实时更新,上线后订单处理效率提升20%,物流信息同步准确率达99.9%,该案例展示了后端开发在系统间集成的价值。
测试与部署:确保开发质量与稳定上线
西西云经验案例:某汽车配件企业开发“自定义订单处理模块”后,通过全面测试流程(单元测试、集成测试)确保稳定性,部署时遵循标准流程,上线后订单处理时间缩短30%,模块故障率降至0.1%,该案例展示了测试与部署流程的重要性。
优化与维护:提升系统性能与安全