上一篇
apache22配置网站详细步骤是怎样的?
Apache 2.2作为一款经典的开源Web服务器软件,至今仍被部分企业和个人用户用于搭建网站环境,其配置过程虽稍显复杂,但通过清晰的步骤和合理的参数设置,完全可以实现稳定高效的网站托管,本文将详细介绍Apache 2.2的网站配置方法,从基础环境准备到虚拟主机设置,再到安全与性能优化,帮助用户快速掌握核心配置技能。
基础环境准备与安装
在配置Apache 2.2之前,需确保系统满足基本要求,以Linux(如CentOS 5.x)为例,首先通过yum或apt-get安装Apache 2.2:
# CentOS系统 yum install httpd -y # Ubuntu/Debian系统(需添加老版本源) apt-get install apache2 -y
安装完成后,启动Apache服务并设置开机自启:
service httpd start # 启动服务 chkconfig httpd on # CentOS设置开机自启 systemctl enable apache2 # Ubuntu设置开机自启
通过浏览器访问服务器IP地址,若看到”It works!”页面,说明安装成功,默认网站根目录位于/var/www/html,配置文件路径为/etc/httpd/conf/httpd.conf。
核心配置文件解析
Apache 2.2的主配置文件httpd.conf是整个服务器的核心,需熟悉其关键模块和参数:
-
服务器全局设置:
- ServerRoot "/etc/httpd":Apache安装根目录,包含配置文件和日志文件。
- Listen 80:监听端口,默认为80,可修改为其他端口(如8080)。
- ServerAdmin admin@example.com:管理员邮箱,用于错误页面显示。
- ServerName www.example.com:80:服务器主机名,建议配置域名解析后的地址。
-
目录权限控制:
<Directory>标签用于定义目录访问权限,例如默认根目录配置:
<Directory "/var/www/html"> Options Indexes FollowSymLinks AllowOverride None Order allow,deny Allow from all </Directory>
- Indexes:允许目录列表,若需禁止,可改为Options None。
- AllowOverride:控制.htaccess文件权限,None表示不读取,All表示允许所有指令。
-
日志文件配置:
- ErrorLog logs/error_log:错误日志路径,记录服务器运行错误。
- CustomLog logs/access_log common:访问日志路径,common为通用日志格式,可自定义格式(如combined)。
配置虚拟主机
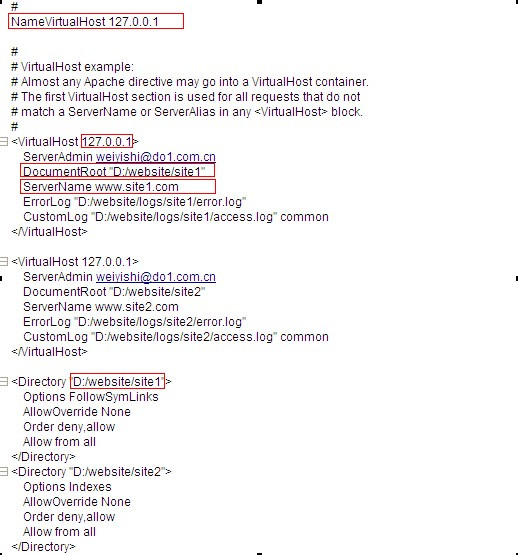
虚拟主机允许一台服务器托管多个网站,Apache 2.2支持基于IP和域名的虚拟主机,以下是域名型虚拟主机配置示例(假设域名www.example1.com和www.example2.com已解析到服务器):
-
创建网站目录:
mkdir -p /var/www/example1 mkdir -p /var/www/example2 echo "This is example1.com" > /var/www/example1/index.html echo "This is example2.com" > /var/www/example2/index.html -
编辑主配置文件:
在httpd.conf中添加以下内容(或单独创建/etc/httpd/conf.d/vhosts.conf文件):
NameVirtualHost *:80 <VirtualHost *:80> ServerAdmin admin@example1.com DocumentRoot /var/www/example1 ServerName www.example1.com ErrorLog logs/example1_error_log CustomLog logs/example1_access_log common </VirtualHost> <VirtualHost *:80> ServerAdmin admin@example2.com DocumentRoot /var/www/example2 ServerName www.example2.com ErrorLog logs/example2_error_log CustomLog logs/example2_access_log common </VirtualHost>- NameVirtualHost *:80:声明基于域名的虚拟主机(需与Listen端口一致)。
- DocumentRoot:每个网站的根目录,需确保用户有读取权限。
-
重启服务生效:
service httpd restart此时通过浏览器访问两个域名,将显示对应的内容。
启用SSL加密(HTTPS)
若需启用HTTPS,需配置SSL模块,Apache 2.2通过mod_ssl实现,步骤如下:
-
安装SSL模块:
-
生成证书文件:
可使用自签名证书(测试用)或购买权威证书,自签名证书生成命令:
openssl req -new -x509 -days 365 -nodes -out server.crt -keyout server.key将生成的server.crt和server.key放置到/etc/httpd/conf/目录。
-
配置SSL虚拟主机:
在httpd.conf中添加:
<VirtualHost *:443> ServerName www.example.com DocumentRoot /var/www/html SSLEngine on SSLCertificateFile /etc/httpd/conf/server.crt SSLCertificateKeyFile /etc/httpd/conf/server.key </VirtualHost>- SSLEngine on:启用SSL引擎。
- SSLCertificateFile和SSLCertificateKeyFile:指定证书和私钥路径。
-
重启服务并测试:
service httpd restart通过https://访问网站,若显示安全锁图标,则配置成功。
-
安全配置:
- 禁用目录列表:在<Directory>标签中设置Options -Indexes。
- 限制访问IP:通过Order deny,allow和Deny from all/Allow from限制特定IP访问。
- 隐藏版本信息:在httpd.conf中添加ServerTokens Prod和ServerSignature Off。
-
性能优化:
- 调整连接数:修改MaxClients(最大并发连接数)、KeepAliveTimeout(连接超时时间)等参数。
- 启用压缩:通过mod_deflate模块压缩文本内容,减少传输数据量: <IfModule mod_deflate.c> AddOutputFilterByType DEFLATE text/html text/plain text/css text/javascript </IfModule>
-
常见问题排查:
- 权限问题:确保网站目录属主为apache(chown -R apache:apache /var/www)。
- 端口占用:使用netstat -tuln | grep 80检查端口是否被占用。
- 语法错误:通过httpd -t检查配置文件语法,错误信息会提示具体行号。
安全与性能优化
Apache 2.2的网站配置需要结合实际需求灵活调整,从基础安装到虚拟主机、SSL加密及性能优化,每一步都需仔细操作,通过合理配置参数和严格权限控制,可搭建出安全、高效的Web服务器环境,建议在修改配置前备份原始文件,并通过逐步测试确保服务稳定运行,对于生产环境,还需结合防火墙、日志监控等手段进一步保障服务器安全。
相关文章
-

VPS性能优化教程怎么做?Making Implicit Concepts Explicit隐式概念显式化原则
-
VPS性能优化教程,Language of the Domain领域语言原则是什么?
-
VPS性能优化教程,Binding Model绑定模型实现原则是什么?
-
VPS性能优化教程怎么做?VPS性能优化方法详解
-
VPS性能优化教程怎么做?VPS优化方法详解
-
VPS性能优化教程,Refactoring Toward Deeper Insight重构深入洞察原则,VPS如何进行性能优化?
-
VPS性能优化教程:Hands-On Modelers实践建模者原则
-
AS4837青云互联悉尼VPS路由分析,青云互联悉尼VPS怎么样