上一篇
如何实现asp.net多语言网站?多语言网站解决方案
在ASP.NET中实现多语言网站(本地化/全球化)可以通过以下核心步骤完成,这里以ASP.NET Core为例(适用于.NET 5/6/7+),同时也会提及传统ASP.NET的方法:
核心步骤 (ASP.NET Core)
配置本地化服务
在 Startup.cs 中注册本地化服务和中间件:
public void ConfigureServices(IServiceCollection services) { // 添加本地化服务并指定资源文件路径 services.AddLocalization(options => options.ResourcesPath = "Resources"); services.AddControllersWithViews() .AddViewLocalization(LanguageViewLocationExpanderFormat.Suffix) // 视图本地化 .AddDataAnnotationsLocalization(); // 数据注解本地化 // 配置支持的语言 var supportedCultures = new[] { "en", "zh-CN", "fr" }; services.Configure<RequestLocalizationOptions>(options => { options.SetDefaultCulture("en"); options.AddSupportedCultures(supportedCultures); options.AddSupportedUICultures(supportedCultures); }); } public void Configure(IApplicationBuilder app) { // 启用请求本地化中间件 app.UseRequestLocalization(); }
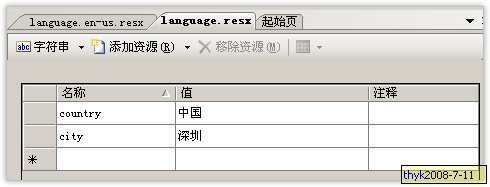
创建资源文件
- 在项目根目录创建 Resources 文件夹
- 按约定命名资源文件:
- 控制器/视图:<控制器名>.<视图名>.<语言>.resx
示例:Views.Home.Index.zh-CN.resx
- 公共字符串:<类名>.<语言>.resx
示例:SharedResource.zh-CN.resx
- 控制器/视图:<控制器名>.<视图名>.<语言>.resx
资源文件结构示例:
Resources/ ├── Views.Home.Index.resx ├── Views.Home.Index.zh-CN.resx ├── SharedResource.resx └── SharedResource.zh-CN.resx
在视图中使用本地化
使用 IViewLocalizer 或直接通过资源键:
@inject IViewLocalizer Localizer <h1>@Localizer["WelcomeHeader"]</h1> <p>@SharedResource["GreetingMessage"]</p>
在控制器中使用本地化
载入 IStringLocalizer<T>:
public class HomeController : Controller { private readonly IStringLocalizer<HomeController> _localizer; public HomeController(IStringLocalizer<HomeController> localizer) { _localizer = localizer; } public IActionResult Index() { ViewData["Title"] = _localizer["HomePageTitle"]; return View(); } }
实现语言切换
添加语言切换器(通常放在布局页):
创建切换语言的Action:
public IActionResult SetLanguage(string culture, string returnUrl) { Response.Cookies.Append( CookieRequestCultureProvider.DefaultCookieName, CookieRequestCultureProvider.MakeCookieValue(new RequestCulture(culture)), new CookieOptions { Expires = DateTimeOffset.UtcNow.AddYears(1) } ); return LocalRedirect(returnUrl); }
数据注解本地化
在模型类中使用本地化:
public class LoginModel { [Required(ErrorMessage = "EmailRequired")] [Display(Name = "Email")] public string Email { get; set; } }
在资源文件中定义 EmailRequired 和 Email 的翻译。
传统ASP.NET (Web Forms) 方法
-
创建资源文件
- 添加App_GlobalResources或App_LocalResources文件夹
- 添加.resx文件(如:Strings.resx, Strings.zh-CN.resx)
-
在页面中使用
<%$ Resources:Strings, WelcomeMessage %> -
代码后台获取
string message = Resources.Strings.WelcomeMessage; -
设置语言
protected override void InitializeCulture() { string lang = Request["ddlLanguage"]; // 从下拉框获取 Thread.CurrentThread.CurrentUICulture = new CultureInfo(lang); Thread.CurrentThread.CurrentCulture = CultureInfo.CreateSpecificCulture(lang); }
最佳实践
-
资源文件管理
- 使用公共资源文件(如 SharedResource.resx)存放全局字符串
- 对大型项目使用按功能模块划分的资源文件
-
回退策略
当请求的语言资源不存在时,自动使用默认语言资源
-
URL本地化
- 实现URL路由包含文化代码:example.com/zh-CN/products app.UseEndpoints(endpoints => { endpoints.MapControllerRoute( name: "default", pattern: "{culture}/{controller}/{action}/{id?}", defaults: new { culture = "en" }); });
-
数据库存储翻译
- 对于动态内容(如CMS),实现自定义 IStringLocalizer 从数据库加载翻译
-
客户端本地化
- 将资源文件导出为JSON供JavaScript使用: var resources = { welcome: "@Localizer["Welcome"]" };
- 检查 CultureInfo.CurrentUICulture 值
- 确保资源文件生成操作设置为 Embedded Resource
- 使用 ResXManager 工具管理资源文件
调试技巧
通过以上实现,可以创建支持多语言的ASP.NET应用,关键是根据项目规模选择合适的资源组织方式,并确保在整个请求管道中正确设置文化信息。