上一篇
html5图片预览
- 行业动态
- 2025-05-09
- 2
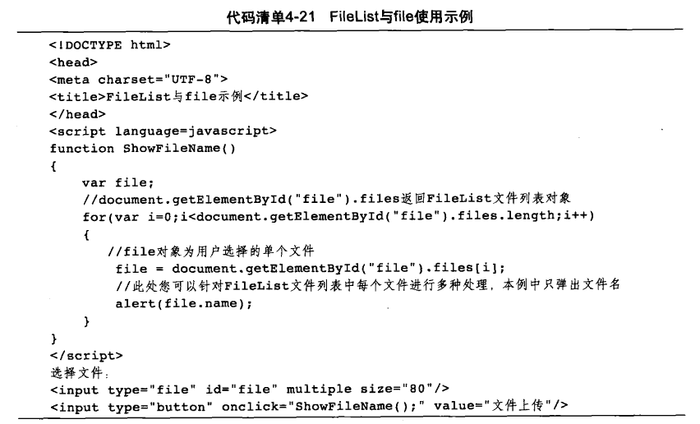
HTML5图片预览可通过FileReader接口实现,用户选择图片后,触发input的change事件,用FileReader读取文件为Data URL,再将URL赋给img标签的src属性,实现实时预览
实现原理
HTML5 图片预览的核心是利用 File 接口获取本地文件,并通过 URL.createObjectURL 生成临时访问路径,将其赋值给 <img> 元素的 src 属性,实现无需上传即可预览图片。
实现步骤
创建文件输入框
使用<input type="file">允许用户选择本地文件。
<input type="file" id="fileInput" accept="image/">
监听文件选择事件
通过change事件监听用户选择文件的操作。const fileInput = document.getElementById('fileInput'); fileInput.addEventListener('change', handleFileSelect);处理选中的文件
获取用户选中的文件对象,并生成临时 URL。function handleFileSelect(event) { const file = event.target.files[0]; if (file) { const url = URL.createObjectURL(file); // 后续操作:显示预览图 } }动态创建预览图
将生成的 URL 赋值给<img>的src,并显示图片。const preview = document.createElement('img'); preview.src = url; document.body.appendChild(preview);
完整示例代码
<input type="file" id="fileInput" accept="image/">
<div id="previewContainer" style="margin-top: 10px;">
  <img id="preview" src="#" alt="预览图" style="max-width: 100%; display: none;">
</div>
<script>
  const fileInput = document.getElementById('fileInput');
  const preview = document.getElementById('preview');
  fileInput.addEventListener('change', function(e) {
    const file = e.target.files[0];
    if (file) {
      const url = URL.createObjectURL(file); // 生成临时 URL
      preview.src = url;
      preview.style.display = 'block';
    } else {
      preview.src = '#';
      preview.style.display = 'none';
    }
  });
</script>
样式调整建议
| 属性 | 说明 | 示例 |
|---|---|---|
max-width: 100% | 限制图片最大宽度,避免变形 | img { max-width: 100%; } |
border | 添加边框 | img { border: 2px solid #ddd; } |
box-shadow | 投影效果 | img { box-shadow: 0 2px 8px rgba(0,0,0,0.2); } |
display: block; margin: 0 auto; | 居中显示 | img { display: block; margin: 0 auto; } |
常见问题与解答
问题1:用户选择了非图片文件(如 PDF),如何提示错误?
解答:在处理文件时,检查 file.type 是否以 image/ 开头,若不符合则提示错误并清除预览。
if (file && file.type.startsWith('image/')) {
  // 正常生成预览
} else {
  alert('请选择图片文件!');
  preview.src = '#';
  preview.style.display = 'none';
}
问题2:如何避免内存泄漏?
解答:使用 URL.revokeObjectURL(url) 释放临时 URL,在文件输入框内容变化时(如用户重新选择文件),手动释放之前的 URL。
let currentUrl;
fileInput.addEventListener('change', function(e) {
  if (currentUrl) {
    URL.revokeObjectURL(currentUrl); // 释放之前的 URL
  }
  const file = e.target.files[0];
  if (file) {
    currentUrl = URL.createObjectURL(file);
    preview.src = currentUrl;
  }